|
|
Operational Obstetrics & Gynecology
Obtaining a Pap Smear
Position the Patient
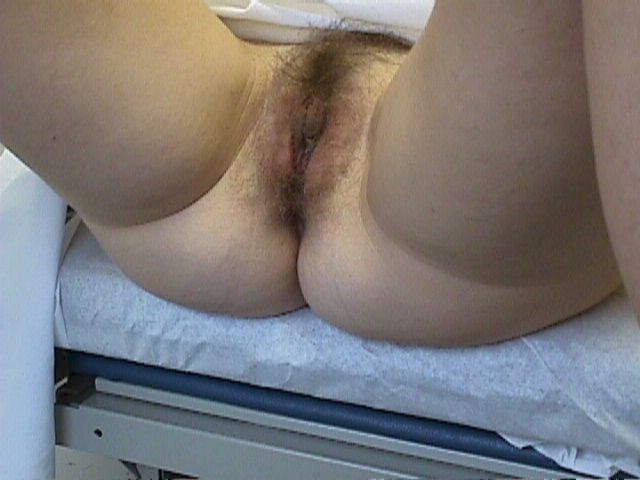 Position the patient with her buttocks just at the edge or just over the edge of the
exam table. If she is not down far enough, inserting the speculum can be more difficult
for you and uncomfortable for her.
Position the patient with her buttocks just at the edge or just over the edge of the
exam table. If she is not down far enough, inserting the speculum can be more difficult
for you and uncomfortable for her.
Appropriate draping should be used to help make the patient more comfortable but not to the point that it obstructs your view. Good lighting is important and is often accomplished with a goose-neck lamp.
Field Expedient Exam Table
 In Field or other military situations, a conventional examination table may not be
available and you will need to improvise. One method is to use a normal bed with the
patient in frog-leg position and the buttocks elevated with a bedpan or folded blanket.
In Field or other military situations, a conventional examination table may not be
available and you will need to improvise. One method is to use a normal bed with the
patient in frog-leg position and the buttocks elevated with a bedpan or folded blanket.
A litter may be used with litter stands repositioned to better support the weight of the patient. IV poles serve as the upright portion of the stirrups. Small battle dressings looped over the IV pole and around the feet complete the stirrups. Note that the patient's legs are positioned outside the IV poles, not inside.
A folded blanket can elevate the head and a second blanket can provide for draping.
Stability of the litter is important. An assistant may be positioned at the opposite end of the litter for this purpose, or sandbags may be used.
A packing crate can serve as a stool, but kneeling on the ground usually positions the examiners eyes at perineum level.
Lighting needs to be the best allowed by the the tactical circumstances. Good lighting can be obtained from a generator-supplied surgical lamp, flashlight, or natural sunlight with a mirror to direct the light into the vagina. At times, the tactical situation may only permit the light from a single red-filtered flashlight. Even with this restriction, a reasonably satisfactory examination may be possible.
Privacy should be provided by a tent, rigging of ponchos, or appropriate blankets. When these methods are not available, employing psychological or "virtual privacy" methods should be attempted.
Pad the Stirrups
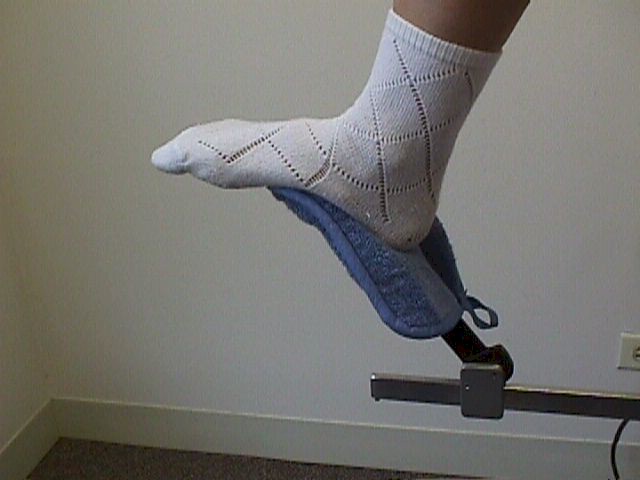 Pad the stirrups so that they don't dig into the patient's foot.
Oven mitts, socks, and even small or medium-sized battle dressings can be used to cushion the stirrup. Allowing the patient to keep her socks on will provide additional padding and help keep the patient's feet warm during the exam.
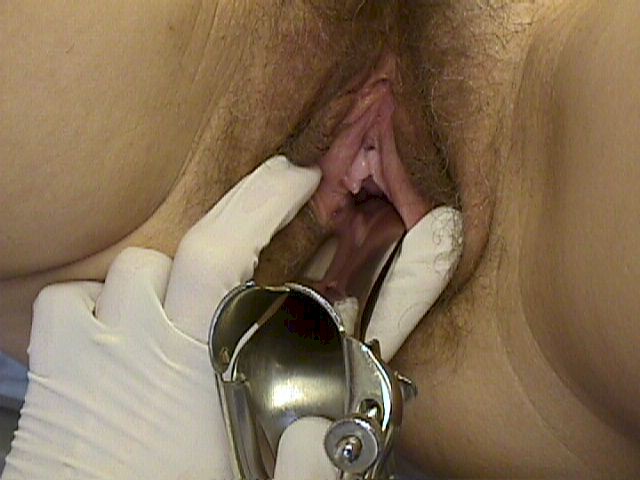
Inspect the Vulva
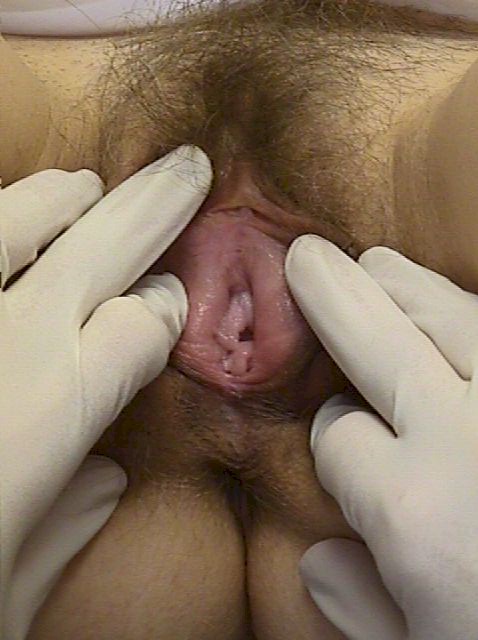 Gently spread the labia apart and inspect the vulva, looking for lesions, masses,
drainage, or discolorations of the skin. Explain what you are doing to the patient to keep
her relaxed.
Gently spread the labia apart and inspect the vulva, looking for lesions, masses,
drainage, or discolorations of the skin. Explain what you are doing to the patient to keep
her relaxed.
Warm the Speculum
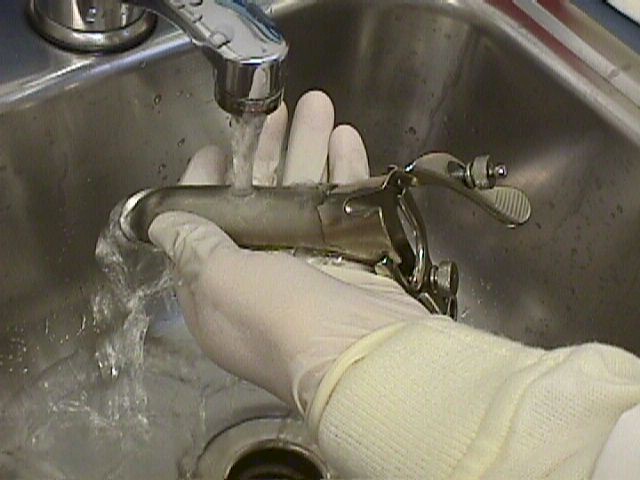 Warm the vaginal speculum.
Running water works well for this as it also lubricates the speculum. Some health care providers use a heated drawer or heating pad to keep the speculums warm. Do not overheat as a speculum that is too hot is just as uncomfortable as one that is too cold.
Never use K-Y Jelly(r), Surgilube(r), Petroleum Jelly or other lubricant to moisten the speculum as it will likely make your Pap smears unreadable under the microscope.
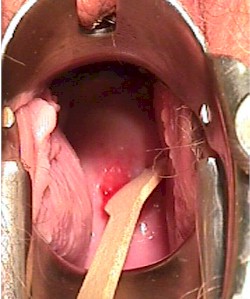
Insert the Speculum
 After warming the speculum, separate the labia and keep them apart.
Insert the speculum into the vagina, letting the speculum follow the path of least resistance. Some vaginas go straight back, parallel to the floor. Other vaginas tilt slightly downward toward the floor as the speculum advances. Others angle upward, away from the floor. Keep the speculum blades closed until the speculum is completely inserted.
Open the speculum and usually the cervix is immediately visible. If not, the cervix is usually just below the lower blade or just above the upper blade. Rocking the speculum downward and upward usually causes the hidden cervix to drop into view.
Lock the blades in the open position, wide enough apart to allow complete visualization of the cervix but not to far open as to be uncomfortable for the patient.
With practice, insertion of the speculum should generally be painless.
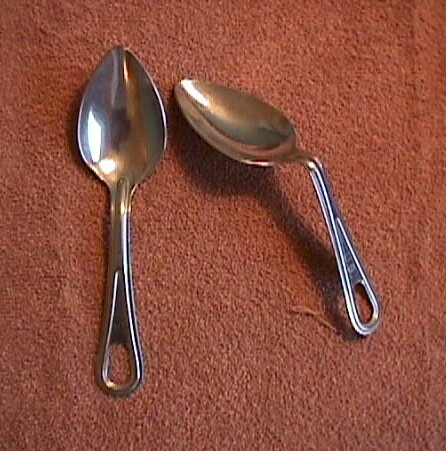
Field Expedient Vaginal Speculum
|
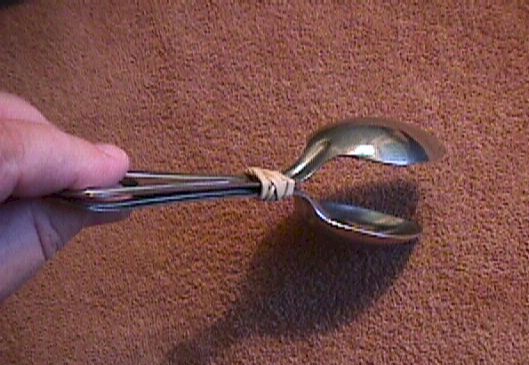
In a field environment, a standard vaginal speculum may not be available. Several good solutions are available.
Standard GI issue spoons can be bent at a 45-degree angle to create the equivalent of a Sims or right-angle retractor.
Two of these bent spoons can be gently inserted, one at a time, into the vagina, after warming and lubricating with warm water. An assistant supports these retractors while the provider manipulates them to expose the vaginal walls and cervix. Positioning one spoon posteriorly and the other spoon anteriorly seems to work the best in the majority of cases. For patients in whom the spoons are too large to comfortably fit inside the vagina, the spoon can be reversed, using the handle as the vaginal wall retractor and the spoon end as a handle.
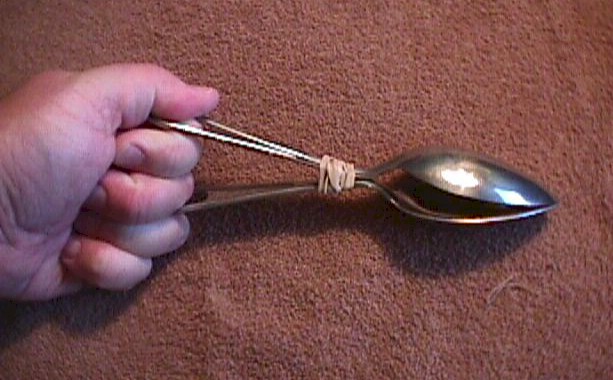
Alternatively, two GI spoons can be bent less severely and connected at the center with a rubber band. At rest, the rubber band holds the spoons apart to expose the vagina and cervix, but for insertion, the spoon handles are separated, closing the spoon ends. After insertion, the spoon handles must be shifted to one side or the other to obtain good visualization to the vagina and access for instruments.
Optimally, these retractor and speculum substitutes should be sterilized before use. Ordinarily, this would require an autoclave, packaging, autoclave heat sensitive tape and control tests. In a military environment, these may not be available but placing the spoons in boiling water for 10 to 15 minutes is a reasonable substitute. If the tactical situation does not allow for any sterilization, clean instruments are much better than dirty instruments.
Start with the Spatula
 The Ayer spatula is specially designed for obtaining Pap smears. The concave end
(curving inward) fits against the cervix, while the convex end (curving outward) is used
for scraping vaginal lesions or sampling the "vaginal pool," the collection of
vaginal secretions just below the cervix.
The Ayer spatula is specially designed for obtaining Pap smears. The concave end
(curving inward) fits against the cervix, while the convex end (curving outward) is used
for scraping vaginal lesions or sampling the "vaginal pool," the collection of
vaginal secretions just below the cervix.
The spatula is made of either wood or plastic. Both give very satisfactory results.
Rotate the Spatula Against the Cervix
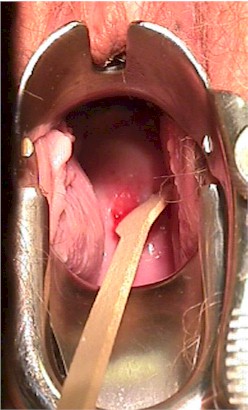 The concave end of the spatula is placed against the cervix and rotated in circular
fashion so that the entire area around the cervical opening (os) is sampled.
The concave end of the spatula is placed against the cervix and rotated in circular
fashion so that the entire area around the cervical opening (os) is sampled.
Usually this can be done without causing any discomfort, although some women are sensitive to the sensation and may experience minor cramping. Sometimes, obtaining this sample causes some bleeding. In this case, reassure the patient that:
- although she may have some minor bleeding or spotting for a few hours, it is not dangerous,
- it will stop spontaneously and promptly
- it is caused by the Pap smear.
Sample the SQJ
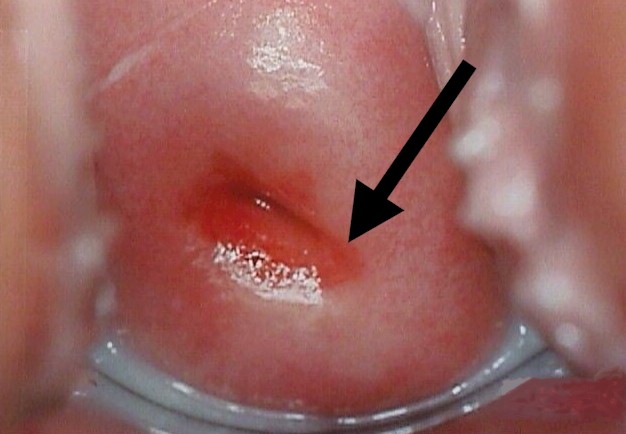 In obtaining the Pap smear, it is important to sample the "Squamo-columnar
Junction." This is the circular area right at the opening of the cervix where the
pink, smooth skin of the cervix meets the fiery-red, fragile, mucous-producing lining of
the cervical canal.
In obtaining the Pap smear, it is important to sample the "Squamo-columnar
Junction." This is the circular area right at the opening of the cervix where the
pink, smooth skin of the cervix meets the fiery-red, fragile, mucous-producing lining of
the cervical canal.
If there is a problem with cancer or precancerous changes, it is this area that is most likely to be effected. This area of unstable skin is also known as the SQJ, or transition zone.
Make a Thin Smear
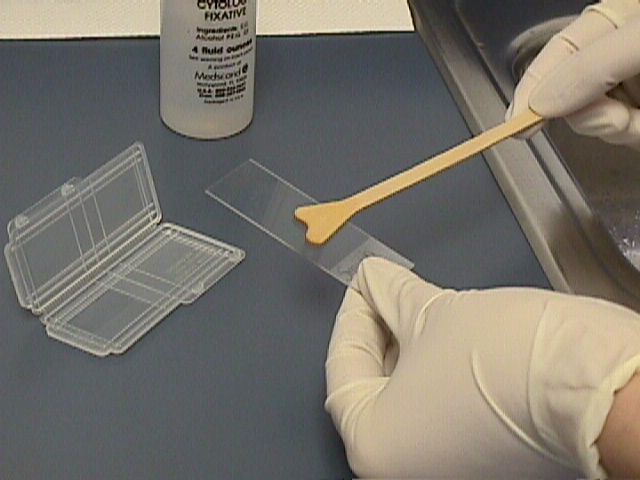 Spread the sample taken from the cervix on a glass slide. Try to make the smear as thin
as possible since this makes it easier for the pathologist or cytotechnician to read. Make
sure the slide is labeled (using pencil on the frosted end).
Spread the sample taken from the cervix on a glass slide. Try to make the smear as thin
as possible since this makes it easier for the pathologist or cytotechnician to read. Make
sure the slide is labeled (using pencil on the frosted end).
In your zeal to make a thin slide, don't spend too much time or else the slide will dry, making it harder for the cytotechnician to read.
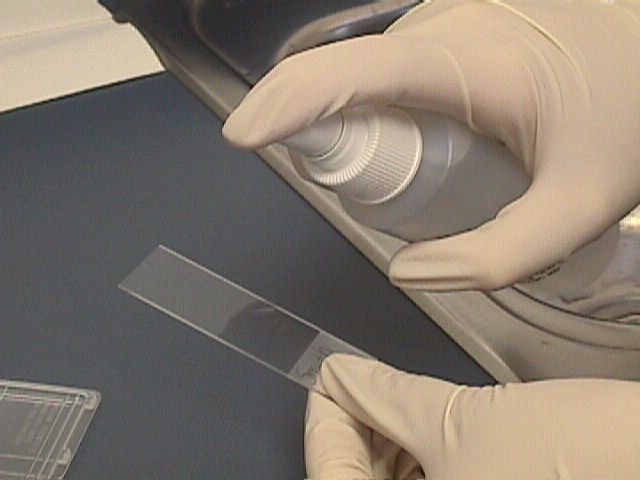 Immediately spray the glass slide with cytological fixative.
If the slide is not immediately sprayed (within about 10-15 seconds), the smear will dry out, making interpretation more difficult or impossible.
If cytological spray is unavailable, any material that has a significant amount of acetone in it can be a reasonably good substitute. Hair spray works well.
Next Use a Brush
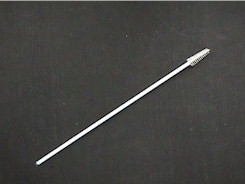 Next, use a "Cytobrush" to sample the endocervical canal, the inside of the
opening leading into the uterine cavity.
Next, use a "Cytobrush" to sample the endocervical canal, the inside of the
opening leading into the uterine cavity.
These soft brushes are designed to be inserted into the canal without causing damage.
Insert and Rotate the Brush 180 Degrees
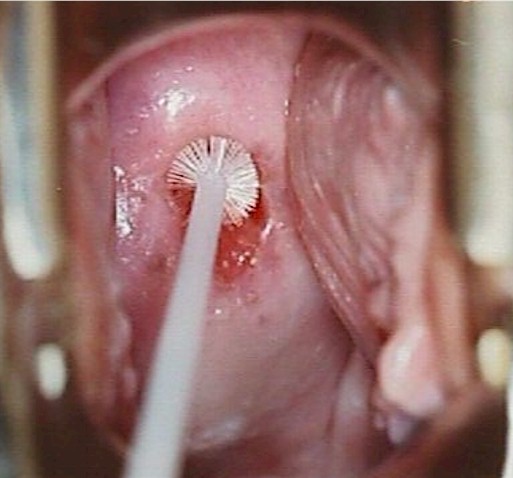 Push the cytobrush into the canal, no deeper than the length of the brush (1.5 cm - 2.0
cm). Rotate the brush 180 degrees (half a circle) and pull the cytobrush straight out.
Don't keep spinning the brush round and round or you will cause bleeding. Even the 180
degree rotation may cause a little bleeding but usually it doesn't.
Push the cytobrush into the canal, no deeper than the length of the brush (1.5 cm - 2.0
cm). Rotate the brush 180 degrees (half a circle) and pull the cytobrush straight out.
Don't keep spinning the brush round and round or you will cause bleeding. Even the 180
degree rotation may cause a little bleeding but usually it doesn't.
Smear the sample on another slide, spreading the material evenly over the slide. Spray with fixative immediately.
Allow the slides to dry completely before placing them in the Pap smear container. Once dry and packaged, it is best to send them out promptly for interpretation. When operational circumstances disallow prompt sending of the slides, they can be held for weeks to months without significant loss of readability.
Make sure the slides are properly labeled and that important clinical information is included with the requisition. Telling the cytologist that the patient has had a hysterectomy will save considerable amounts of time in evaluating the smear.
For women who have had a hysterectomy, Pap smears are obtained by using the convex end of the Ayer spatula, scraping it horizontally across the top of the vagina. Then the cytobrush is used to reach into the the right and left top corners of the vagina.
This outline of Pap smears describes a "two-slide" technique. Often, only a single glass slide is used (a "one-slide" technique). Using only a single slide, the Ayer spatula is smeared over one end of the slide and the cytobrush is smeared over the other end. It is fine if there is overlap between the two areas and it doesn't matter which smear is placed on which end of the slide.
*This video is a special feature provided by the Brookside Associates Medical Education Division and was not present on the original version of Operational Obstetrics & Gynecology.
Home À Introduction À Medical Support of Women in Field Environments À The Prisoner of War Experience À Routine Care À Pap Smears À Human Papilloma Virus À Contraception À Birth Control Pills À Vulvar Disease À Vaginal Discharge À Abnormal Bleeding À Menstrual Problems À Abdominal Pain À Urination Problems À Menopause À Breast Problems À Sexual Assault À Normal Pregnancy À Abnormal Pregnancy À Normal Labor and Delivery À Problems During Labor and Delivery À Care of the Newborn
|
Bureau of Medicine
and Surgery |
Operational
Obstetrics & Gynecology - 2nd Edition |
This web version of Operational Obstetrics & Gynecology is provided by The Brookside Associates Medical Education Division. It contains original contents from the official US Navy NAVMEDPUB 6300-2C, but has been reformatted for web access and includes advertising and links that were not present in the original version. This web version has not been approved by the Department of the Navy or the Department of Defense. The presence of any advertising on these pages does not constitute an endorsement of that product or service by either the Department of Defense or the Brookside Associates. The Brookside Associates is a private organization, not affiliated with the United States Department of Defense. All material in this version is unclassified.
This formatting ® 2006
Medical Education Division,
Brookside Associates, Ltd.
All rights reserved